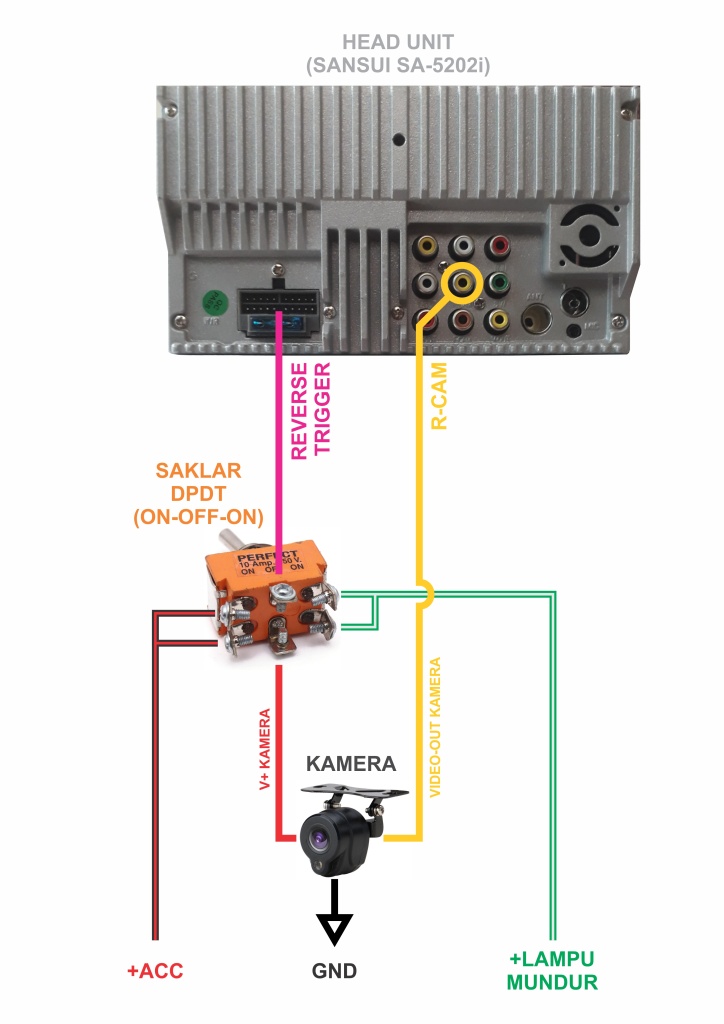
Benar nggak sih ini ballast 50W? Benar nggak sih outputnya real 50W? Ngaruh nggak sih kalo bulb HID 35W dinyalain pakai ballast 50W? Seberapa efisien kinerja ballast HID yang saya punya?
Pertanyaan ini kadang muter-muter di dalam kepala 😀
Nah, kenapa nggak diukur aja?
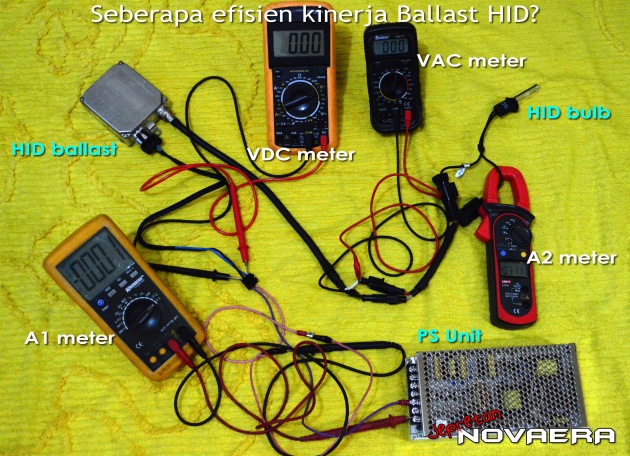
Klik untuk memperbesar
Peralatan ukur seperti pada gambar …
VDC meter untuk mengukur voltase (DC) input ballast
VAC meter untuk mengukur voltase (AC) output ballast
A1 meter untuk mengukur arus (ampere) input ballast
A2 meter untuk mengukur arus (ampere) output ballast
VDC meter
Set multimeter ke range “20VDC”. Probe (tester) merah multimeter terpasang di jalur positif input ballast, sedangkan probe (tester) hitamnya di jalur negatif input ballast. Kabel input ballast adalah kabel dari suplai menuju ballast.
VAC meter
Set multimeter ke range “600V AC”. Probe (tester) merah multimeter terpasang di jalur “hot” output ballast, sedangkan probe (tester) hitamnya di jalur “return” output ballast. Kabel output ballast adalah kabel dari ballast menuju bulb HID. Jalur “hot” adalah jalur yang menuju elektroda bulb, sedangkan jalur “return” adalah yang keluar dari bulb … jalur “return” biasanya berupa kawat berbungkus pipa keramik yang ada di sisi luar bulb HID.
A1 meter
Set multimeter ke range “10A” atau “20A” — biasanya ada colokan khusus untuk range ini (baca manual multimeter). Probe (tester) merah multimeter terpasang di jalur positif suplai, sedangkan probe (tester) hitamnya di jalur positif input ballast. Ini berarti arus listrik akan mengalir dari suplai, melewati multimeter, dan menuju ballast.
A2 meter
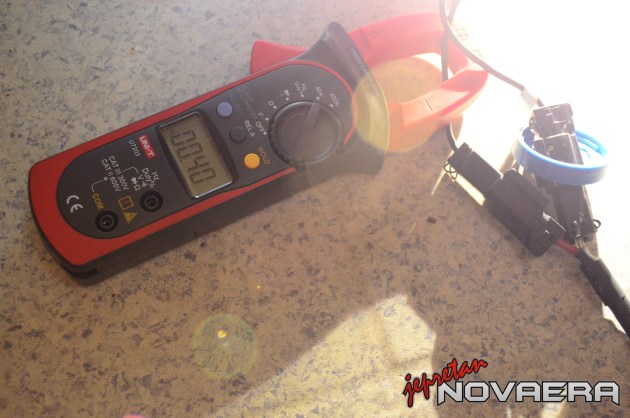
Untuk meteran ini, sebaiknya gunakan tang ampere (clamp meter). Tinggal kalungkan aja tang ampere ke jalur “hot” output ballast/bulb HID. Set meteran ke range “Ampere AC”.
Mengukur input ballast
Alat ukur “VDC meter” dan “A1 meter” dalam posisi terpasang.
Nyalakan HID, dan baca hasil meteran … volt DC dan ampere DC. Catat!
Mengukur output ballast
Untuk mengukur volt AC output ballast, sebaiknya TIDAK dilakukan pada saat bulb “start-up”. Pengukuran dilakukan setelah bulb dalam kondisi menyala normal. Kenapa? Karena pada saat “start-up” voltase yang dikeluarkan ballast bisa mencapai 23~24 ribu volt! Kecuali alat ukur Anda bisa membaca dengan range melebihi itu, jangan PERNAH memasang alat ukur pada saat kondisi bulb “start-up”!
Setelah bulb dalam kondisi menyala normal, ukur voltase AC dan amperenya. Catat!
Menghitung input ballast
Daya listrik yang dibutuhkan ballast untuk menyalakan bulb HID bisa dihitung dari hasil bacaan VDC meter dan A1 meter.
Daya input ballast = VDC meter × A1 meter
Daya input ballast: Watt
VDC meter: Volt DC
A1 meter: Ampere
Contoh:
Hasil pengukuran input ballast, terbaca di VDC meter = 13.2VDC dan A1 meter = 4.2A
Daya input ballast = 13.2V × 4.2A = 55.4W
Menghitung output ballast
Daya listrik yang dikeluaran ballast untuk bisa menyalakan bulb HID bisa dihitung dari hasil bacaan VAC meter dan A2 meter.
Daya output ballast = VAC meter × A2 meter
Daya output ballast: Watt
VAC meter: Volt AC
A2 meter: Ampere
Contoh:
Hasil pengukuran output ballast, terbaca di VAC meter = 98.4VAC dan A2 meter = 0.48A
Daya output ballast = 98.4V × 0.48A = 47.3W
Menghitung efisiensi kinerja ballast
Selisih antara daya output dan input ballast menunjukkan seberapa persen tingkat efisiensi kinerja ballast. Ballast dikategorikan efisien jika persentase efisiensi kerjanya 75% ke atas.
Efisiensi kerja ballast = Daya output ballast ÷ Daya input ballast × 100%
Contoh:
Dari hasil ukuran dan hitungan di atas, daya output ballast adalah 47.3W dan daya input ballast adalah 55.4W … maka efisiensi kerja ballast = 47.3W ÷ 55.4W × 100% = 85.37%
Masih termasuk kategori “ballast efisien” 😀
Ini contoh pengukuran ballast Hyluxtek 35W + bulb Philips LS 35W 4200K:

Hasil baca arus input ballast

Hasil baca voltase output ballast
Hasil baca arus output ballast